

Creating an SAP HANA HDB Table
Welcome to the next tutorial on the three part series explain different ways to create tables. In this one, we learn how to create an SAP HANA HDB table. It is recommended that you also read the first two parts as well.
To recap, the main methods to create a table are:
- Using the graphical method that has been already discussed.
- Using the SQL script method which has been already discussed.
- Using the HDB tables method which will be discussed here.
- Using the HDBDD method discussed in a separate tutorial.(Recommended method in non XSA projects).
- Using the HDBCDS method which would be discussed in a future tutorial(Recommended method in XSA projects).
To start off, if you remember my earlier tutorials, I recommended to always remain in the “SAP HANA Development” perspective of HANA. For this tutorial, it is mandatory that you are in the development perspective to move forward. Read this tutorial again if you don’t remember how to switch perspectives.
Grouping Development objects – Creating a SAP HANA Package
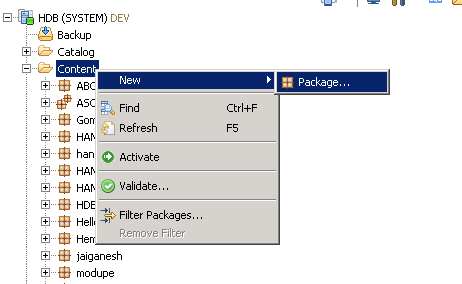
Until now, we have done everything in the Catalog folder, but the HDB table code is to be written in the Content folder. All such objects and future analytical objects that we create will be in the Content folder. All developments have to be grouped under a “Package”. Package is just another layer of grouping for all development and modeling objects. Inside content, let’s create a new package for all our future developments. To do this, right click on the content folder, and follow the path shown below to click on “Package”

Give it a name and description and press OK. I am prefixing a zero to make sure my package comes up on top as it is sorted by symbols, numbers and then alphabets. You can provide any relevant names.


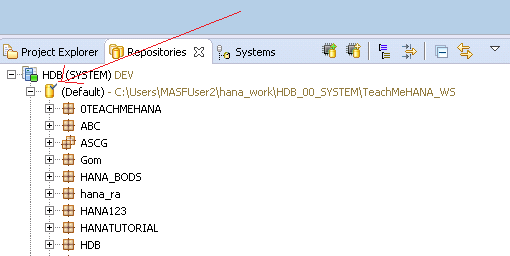
Then move to the repositories tab as shown below. If you are going here for the first time, you need to import the Workspace into your local memory.
To do this, press “Import Remote Workspace” after right clicking on the (Default) repository as shown below.


Provide a folder for this to be imported to.


Once done, you will notice a small tick symbol on top of the repository icon as marked below.

Creating an SAP HANA HDB table in the repository
Now, right click on the newly created package and select the “Other” from the context menu path shown the illustration.
Note: If you don’t see the repository tab and are lost at this point, that means you are not in the Development perspective. You can see this on the top right of your HANA Studio as shown below.


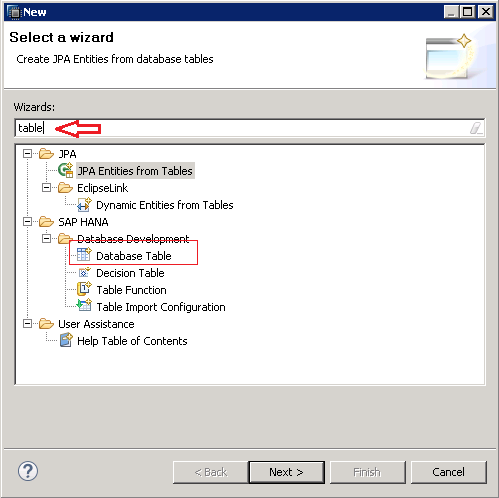
A wizard opens up. Write ‘table’ in the search bar marked by the red arrow as shown below. The objects with Table in the name show up. Select Database table as circled below and click next.

Provide a table name as shown below and leave the template as blank.


This will open up a blank editor screen where in you need to put in the HDB Table code. This is a simple code although it is not SQL It is a HANA internal syntax.
The syntax to be used is:
table.schemaName = “<Schema_Name>” ;
table.tableType = <Type_of_table> ;
table.columns =
[
{name = “<field1>” ; sqlType = <SQL_Datatype1>; length = <Length_of_characters>;comment = “<Optional_Description>”;},
{name = “<field2>” ; sqlType = <SQL_Datatype2>; length = <Length_of_characters>;comment = “<Optional_Description>”;},
{name = “<fieldN>” ; sqlType = <SQL_DatatypeN>; length = <Length_of_characters>;comment = “<Optional_Description>”;},
];
table.primaryKey.pkcolumns = [“<primary_key_field1>”,”<primary_key_field2>”];
What does this even mean?
<Schema_Name> refers to the target schema where you wish the table to be created in.
<Type_of_table> can take two values ROWSTORE and COLUMNSTORE. You should ideally keep this as COLUMNSTORE unless there is a special requirement to do so. To know the difference between ROWSTORE and COLUMNSTORE click here.
<field> refers to the name of the fields you wish to add in this table.
<SQL_Datatype> refers to the datatype of the field
length = <Length_of_characters>; This section signifies the length of your field. Please omit this for INTEGER types as they don’t require a specified length.
comment = “<Optional_Description>”; This is also an optional section specifying the description of a field.
<primary_key_field> takes all the primary key field names separated by a comma.
Let’s create the same table structure we created in the other cases. To download the code I used below, click here.
According to the above syntax, the code would be as below. Press the activate button marked by the arrow below.
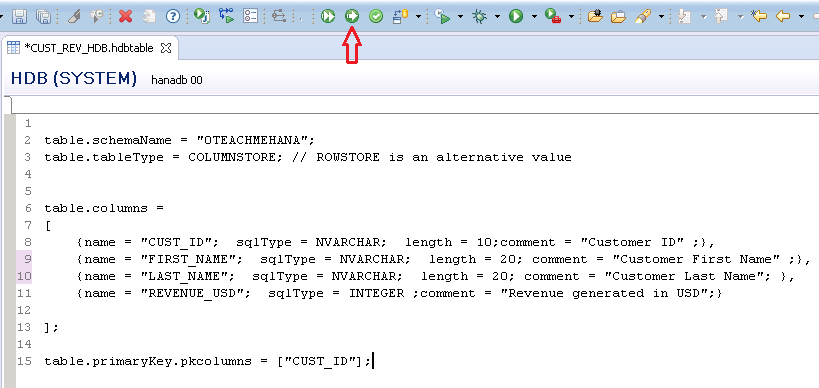

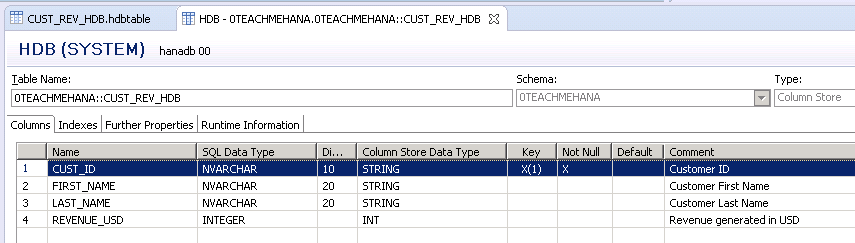
This should create this table in the 0TEACHMEHANA schema. Once built, it’s the same as a regular table. Go back to the Systems tab and in this schema, go to the tables folder and refresh it.


You would notice that the table has been created. It works the same way but has some additional capabilities that we will discuss in upcoming tutorials. Also, you might notice that the package name is also prefixed to the table name automatically. That’s something exclusive to HDB Tables.


Double clicking on the HDB table shows the structure has been defined as required.

This marks the successful completion of our tutorial.
HDBTables are the recommended form of tables to be used whenever custom tables are to be created. The only reason I use the other forms of table creation are for quickly creating and testing something but for actual deliverables, only HDB tables must be created.
Edit (25-Jun-2017): Only CDS based tables are the best practice as of this date. These can be HDBDD tables (described in the next tutorial) or HDBCDS table (for XSA based projects)
Their advantages will be further clear in our further tutorials so stay tuned for new posts.
Thank you for reading this tutorial on creating an SAP HANA HDB table and if you liked it, please share this document across social media using the share buttons below. Also, don’t forget to subscribe to our newsletter to get the latest updates on added tutorials.
Happy learning!