Legacy: SAP HANA Attribute view
Welcome folks to the Attribute View in SAP HANA tutorial. In this tutorial, we learn the second type of view that can be created called the attribute view. We have been creating calculation views till now.
Note: Attribute views are no longer recommended to be used in development. Calculation views with Data Category “DIMENSION” should be used instead. Thus, this tutorial is created with a “Legacy” title. The only reason to still include this in our tutorial is due to the fact that some projects still have attribute views passed on from their old developments. The only case where you should create a new attribute view is when due to some performance issue, someone from SAP support team recommends you to create one (which is a rare scenario).
Attribute views are built specifically for master data. Thus, there will not be any measures in the output for this view. Their primary purpose was to maintain a reusable pool of master data which could then be combined with transaction data in Calculation views or Analytical views (which you will learn in the next tutorial). Thus you could have a master data analytical view called MATERIAL which could combine all material related tables and also create new calculated fields. This newly created view could then be used anywhere in other views where all the fields required from MATERIAL could be picked up, thereby avoiding the rework of joining the tables every single time.
Creating an attribute view
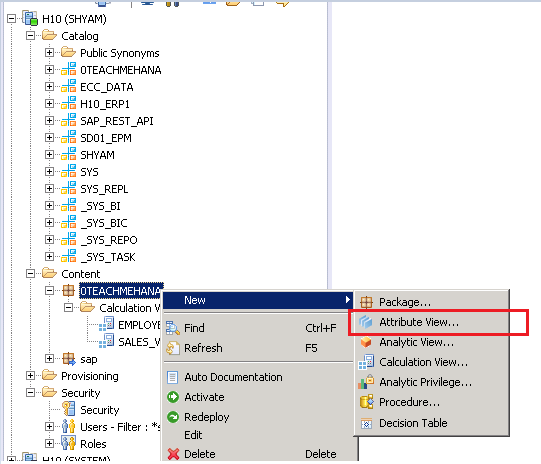
To Create an attribute view, right click on a package and select New Attribute view from the context menu.
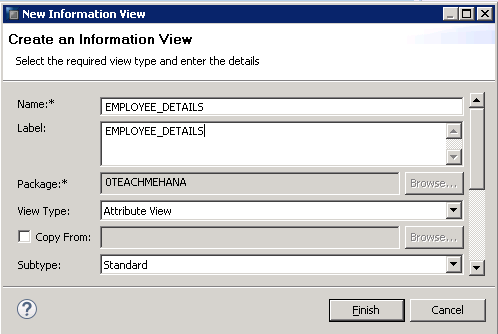
Fill in the name and description of the view and press “Finish”.
1
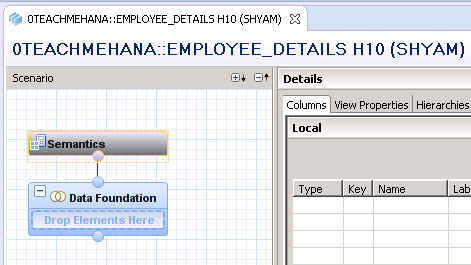
The below screen opens up. Notice that the semantics is not connected to an Aggregation node here. It is connected to a “Data Foundation” A “Data Foundation” is a node which you cannot remove. It is purely used to include tables into the view. You can use a singular table here or have more by specifying the join condition inside this “Data Foundation”. There is no separate JOIN node that you can insert here. You cannot insert views into the “Data Foundation”. It only accepts tables.
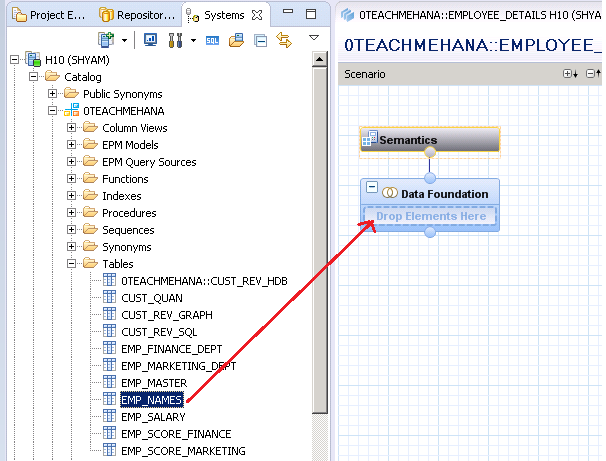
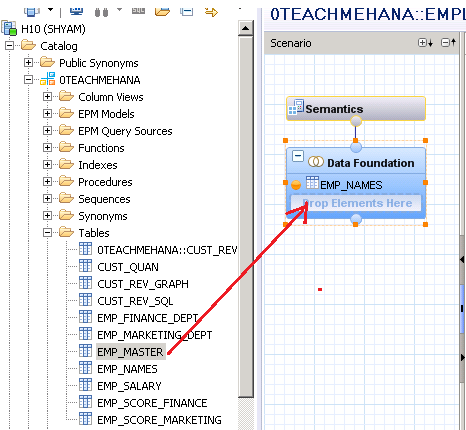
Let’s drag the EMP_NAMES table into the “Data Foundation” as shown below.
Once it is there, click on the “Data Foundation” node and the field selection “Details” section would open up on the right as shown below. Select all the fields by the same method as always- Clicking on the grey buttons to make them orange.
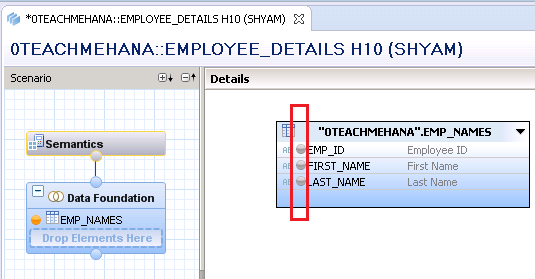
As seen below, the fields have been enabled successfully.
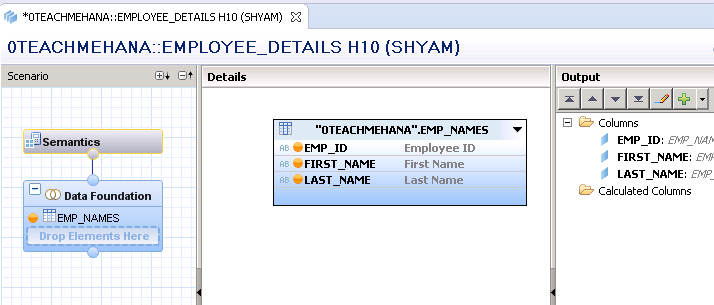
1
An attribute view, unlike the other views, requires at least one field to be declared as the “Key” field – which is a field that has a unique value in each row and thus isn’t repeated.
Update:(20-Apr-17) As someone in the comments pointed out and as confirmed by me on the SAP HANA SP12 system, this setting of “Key” field is no longer a mandatory step which does seem strange as SAP stopped enhancing attribute views a long time ago. Any ways, it’s a pointless debate now that we know for sure that the attribute views are obsolete.
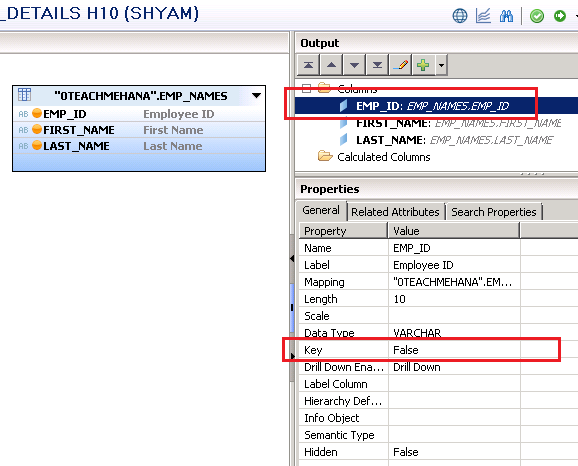
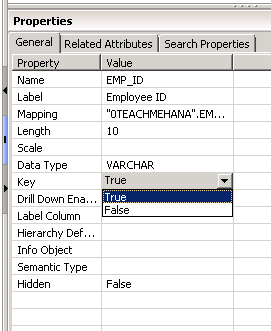
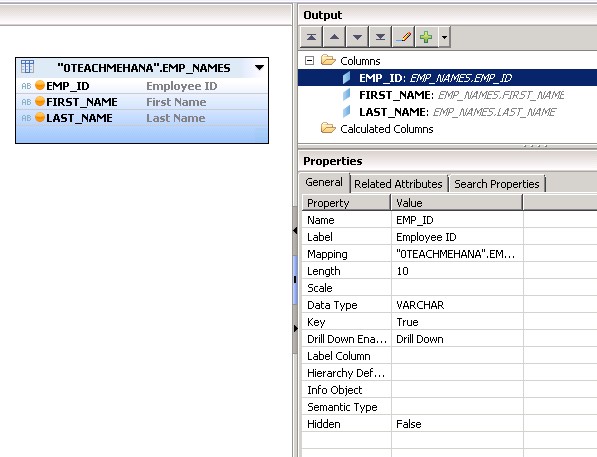
Click on the field which you wish to enable as Key under the Columns folder. In this case, we single click on EMP_ID as marked below. This opens up the properties section below it. Here, change the Key configuration from “False” to “True” by clicking on it.
Drop down the choices and select True.
As seen below, the key has been enabled.
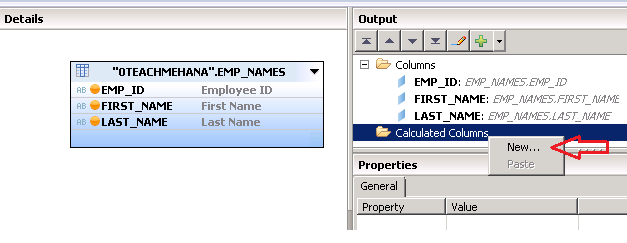
Our view is done, but let’s do something more. We have already created Calculated Columns for Calculation view. The same process applies here if you need to create one. To add a new field, FULL_NAME as a concatenation result of fields FIRST_NAME AND LAST_NAME, right click on the “Calculated Columns” folder and select “New”.
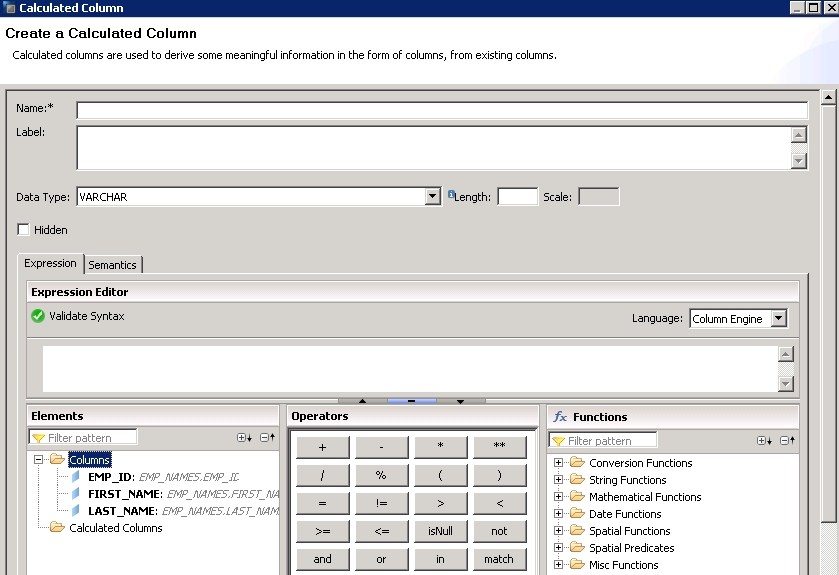
The familiar window opens up asking for the name and datatype of this new field.
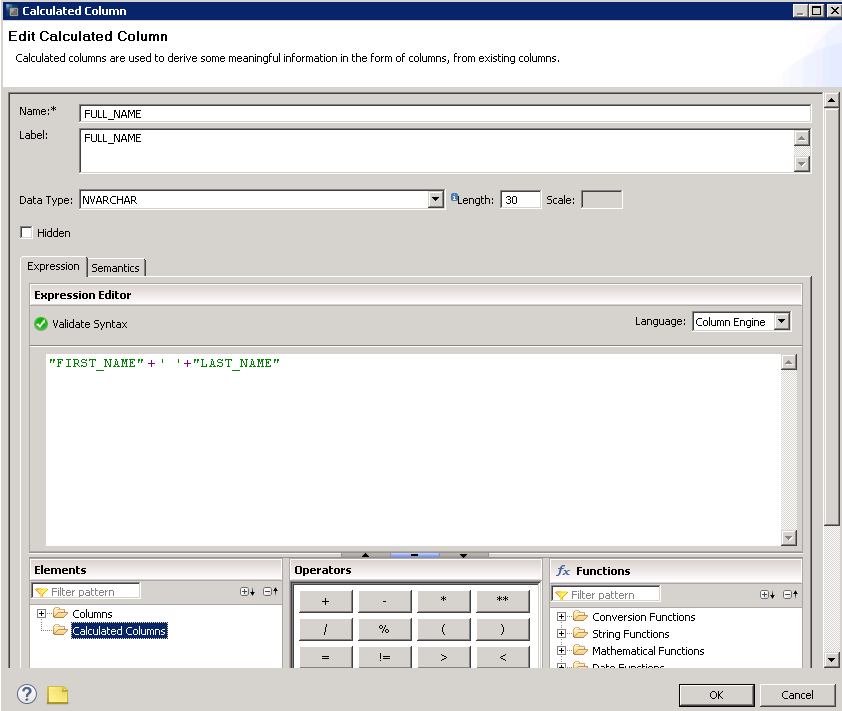
After providing the details, it should look as the below. Full name and last name concatenate using the Plus(+) operator and there is a blank space in between them to keep the words separate.
As seen below, the new field has been added.
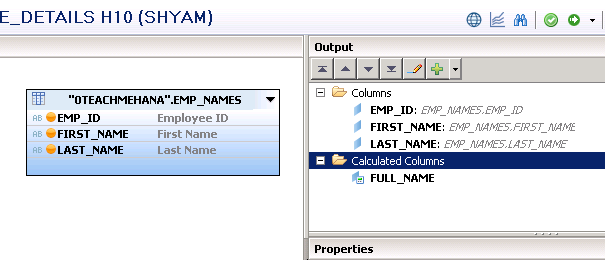
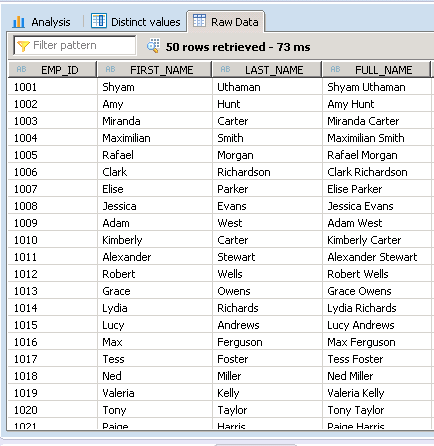
Save and activate this view. Now run a data preview.
As seen below, the selected fields as well as the calculated field are now available in output.
Let’s assume another scenario where the view required the employee’s age, Email and Phone number as well. But the table we have in this view currently doesn’t have these fields. But if we could join EMP_NAMES with EMP_MASTER table, we could have all the fields we require.
Drag and drop EMP_MASTER into the data foundation.
Now, we have 2 tables here. There are not joined yet since there is no link defined between them. Also, the fields we require aren’t yet selected from EMP_MASTER.
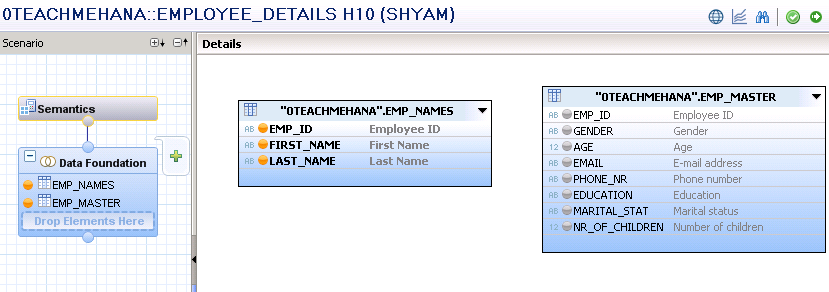
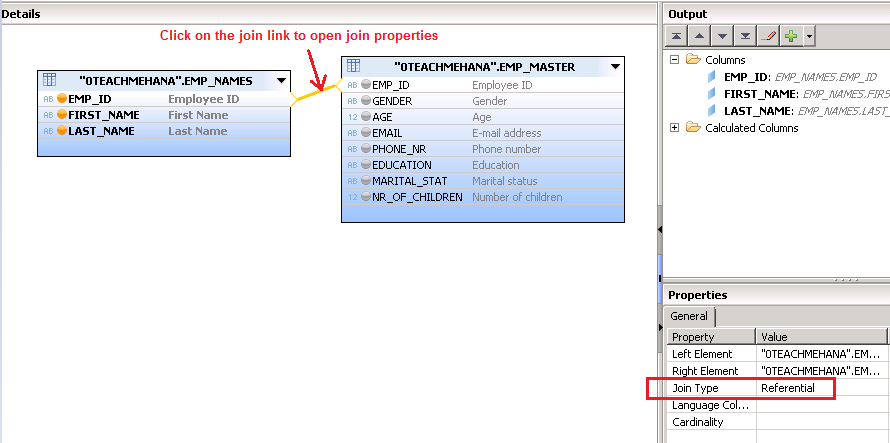
First we connect EMP_ID from each table to the other. This completes the JOIN. Click on this linking line as shown below to open up the JOIN properties.
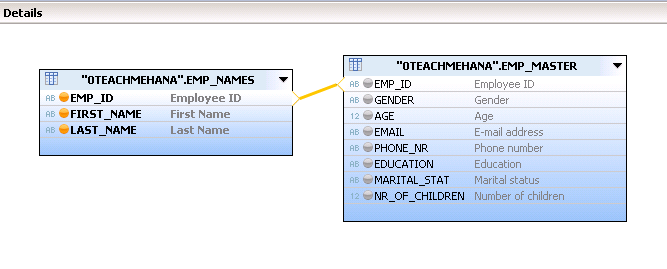
The default JOIN type is “Referential”. If you need to refresh your memory on the different JOIN types – revisit the tutorial on this by clicking here.
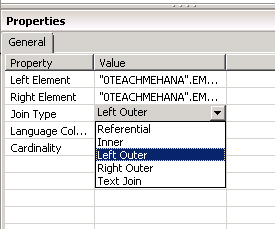
Opening up the JOIN type setting provides a list of available options. Switch it to LEFT OUTER JOIN.
Once this is done, enable the required fields as per your requirement to send them to the next level.

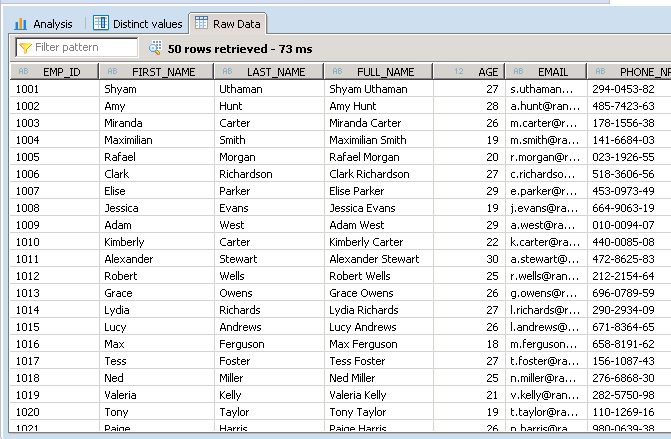
Save and activate this view. Now execute a data preview to check the data. As seen below, the JOIN is successful and data appears as required.
This ends our tutorial on attribute views. I hope this was helpful.
Share, subscribe and comment on this tutorial to help others reach this website.
You are doing well. Keep going.. almost there.
Hi Shyam,
When we are working on BW on HANA landscape, is it possible that we directly import master data to calc view with Dim or that is the case where we still have to use Attribute view to load our Master Data ?
1. As this is a view, there is no importing or loading of data. Data models are virtual.
2. Attribute views are dead. Even SAP doesn’t use them in the content they build.
Hi Shyam,
As you mentioned we should at least create one “key field” in an attribute view. I am able to create an attribute view and activate it without any error. So why is it necessary to create a key field for an attribute view?
Thanks in advance,
FM.
It used to be mandatory but I checked on the SP12 system that I have now and it allows without the key option also. It seems that this restriction has been taken off. Thanks for the information. Will add that as an update to this tutorial. Did not notice this since there hasn’t been a need for creating an attribute view in the last few years.